When I wrote my "Hot to setup a front cover" a few people had a hard time lapping the oil filter adaptor. When I did that article I had a friend with access to a machine that did it for me.
Fast forward to the present I now get to do it by hand.
First, get something flat to work with, some masking tape and some sand paper. Clean the glass and make sure there's no crud on it. We can't have high spots on the sandpaper. Next hold the part as low as possible and as close to the center as possible. The trick is to not let the part wobble. There's no need to use force, let the paper do the cutting.
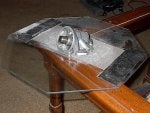
On my adaptor I had to remove a LOT of metal. My car was stolen, blew up the cooling system and ran it so hot that the oil pump seized and sheared off the pump's shaft. Needless to say it got gouged up pretty good. You most likely won't have to start with corse grit like I did.
This is what I started with:
![Image]()
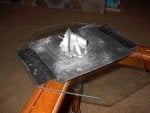
I put a piece of 150 grit on the glass and started doing figure 8's dry untill the damage was gone. (Note: I dont' recommend using the skinny paper like in the picture. It will allow the edges to curl up a little and that will cause the edge of the part to get radiused)
![Image]()
After the damaged areas were gone I switched to fine grit wet/dry paper.
![Image]()
As the part gets closer to done you can actually feel the workpiece stick to the paper. My setup is just the right size to fit in the sink. I put the glass in there, turned on the water and basically wetsanded the part untill I was happy with it.
The finished part will have a nice satin to semigloss finish when done. You'll also notice that when you set the flat side on the glass you can actually feel an air cushion right before it hits. Much like a puck on an airhockey table. IT also won't wobble when placed on a flat surface.
![Image]()
![Image]()
Next it's a good idea to place the filter adaptor on the cover roughly in it's place. Move the adaptor around in a small circle then look at the finish. Any hight spots or burrs on the timing cover will swirl the new finish you just made. Of all the cover's I've built, every single one had high spots from the outside corner and/or around the tapped bolt holes (might have one from drilling out the pressure feed too). Might as well lap that surface too.
That might be very important on an aftermarket cover. I've only assembled GM covers but I've heard from posters here that the gears are below flush on aftermarkets. If that's the case, removing metal there should increase oil pressure.
Macdizzy has a pretty good writeup on his website talking about lapping that's probally a little better written than mine.
Fast forward to the present I now get to do it by hand.
First, get something flat to work with, some masking tape and some sand paper. Clean the glass and make sure there's no crud on it. We can't have high spots on the sandpaper. Next hold the part as low as possible and as close to the center as possible. The trick is to not let the part wobble. There's no need to use force, let the paper do the cutting.
On my adaptor I had to remove a LOT of metal. My car was stolen, blew up the cooling system and ran it so hot that the oil pump seized and sheared off the pump's shaft. Needless to say it got gouged up pretty good. You most likely won't have to start with corse grit like I did.
This is what I started with:
I put a piece of 150 grit on the glass and started doing figure 8's dry untill the damage was gone. (Note: I dont' recommend using the skinny paper like in the picture. It will allow the edges to curl up a little and that will cause the edge of the part to get radiused)
After the damaged areas were gone I switched to fine grit wet/dry paper.
As the part gets closer to done you can actually feel the workpiece stick to the paper. My setup is just the right size to fit in the sink. I put the glass in there, turned on the water and basically wetsanded the part untill I was happy with it.
The finished part will have a nice satin to semigloss finish when done. You'll also notice that when you set the flat side on the glass you can actually feel an air cushion right before it hits. Much like a puck on an airhockey table. IT also won't wobble when placed on a flat surface.
Next it's a good idea to place the filter adaptor on the cover roughly in it's place. Move the adaptor around in a small circle then look at the finish. Any hight spots or burrs on the timing cover will swirl the new finish you just made. Of all the cover's I've built, every single one had high spots from the outside corner and/or around the tapped bolt holes (might have one from drilling out the pressure feed too). Might as well lap that surface too.
That might be very important on an aftermarket cover. I've only assembled GM covers but I've heard from posters here that the gears are below flush on aftermarkets. If that's the case, removing metal there should increase oil pressure.
Macdizzy has a pretty good writeup on his website talking about lapping that's probally a little better written than mine.