

The first thing to keep in mind is that a brand new GM front cover is NOT ready to install out of the box. There is casting flash and all kinds of mismatched ports in both the cover and the gaskets. Most of what I'm about to type will be kind of hard to follow unless you haVe the parts in front of you. The good think is that anyone can do this with very basic hand tools and a Dremel.
Tools needed: Some sort of Dremel tool (A cordless works fine. The cover isn't that tough), a needle file set, 1/2" drill, straight edge (I used my caliper body), feeler gauges, and normal hand tools.
I started with a new GM cover and a Melling oil pump kit. (see post http://www.turbobuicks.com/forums/showthread.php?t=38761 ) The gears are both .8725" tall. (my 140,000GM gears were .8625"). The Melling gears in my cover stuck up .005 above the gasket surface. The gasket that came with the Fel-Pro timing cover gasket kit is .0075 and the Melling gasket was a slimer .006". Those are the uncompressed readings. When I torqued down the thinker gasket, my pump locked up. To get clearance, I had to stack (2) .006 gaskets that I had at the house to make the gears spin. Once you've picked out your gaskets, it's time to fire up the Dremel and make some metal shavings.
It's a good idea to warm up the the cooling passages. That way you can get the Dremel juices flowing without being able to mess with anything critical. Inside the two coolant passages are LOTS of flashing and steps. I like the little 1/2" sanding drums. Them make quick work of that stuff. If you really want to go all out, a small round burr will get into the corners good too. On the front of the cover where they meet the waterpump there's a LARGE step that could stand some smoothing too. (notice that the outside has alot of boogers on it too. I knocked most of them off my cover just to help keep it cleaner) After you've made a nice mess and got all ready to move metal, let's move on to the oil passages.
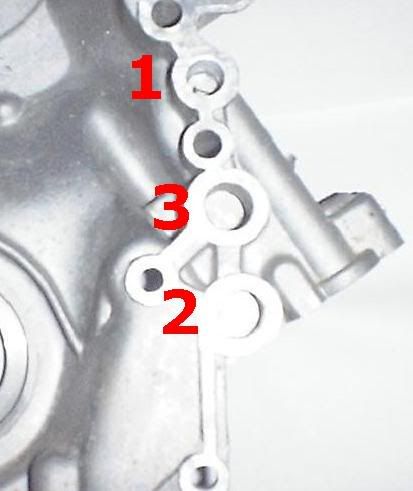
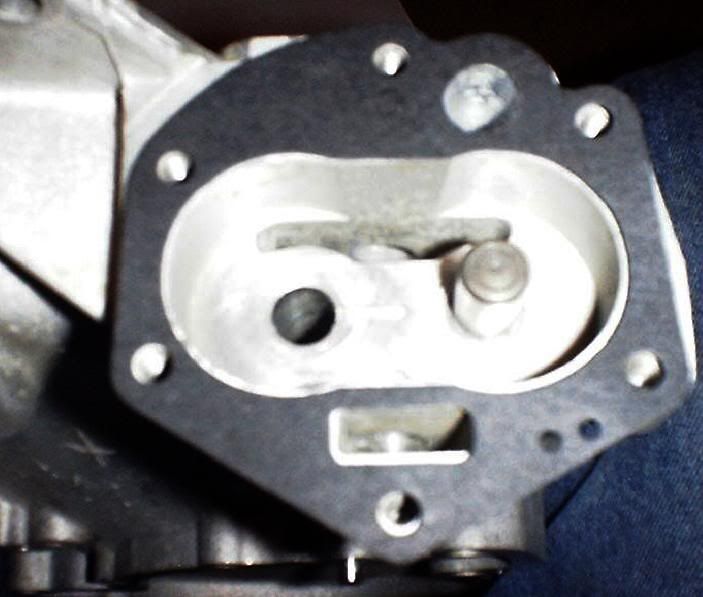
While looking at the cover you'll notice that there are 3 openings that go to oil cavities.
![Image]()
#1 is the high pressure feel hole that supplies the engine with oil (black gold, Texas tea).
#2 is the feed line from the oil pickup in the pan. (Notice that it's not exactly round. More on that later)
#3 is not used as it mates to a solid chunk of iron on the block.
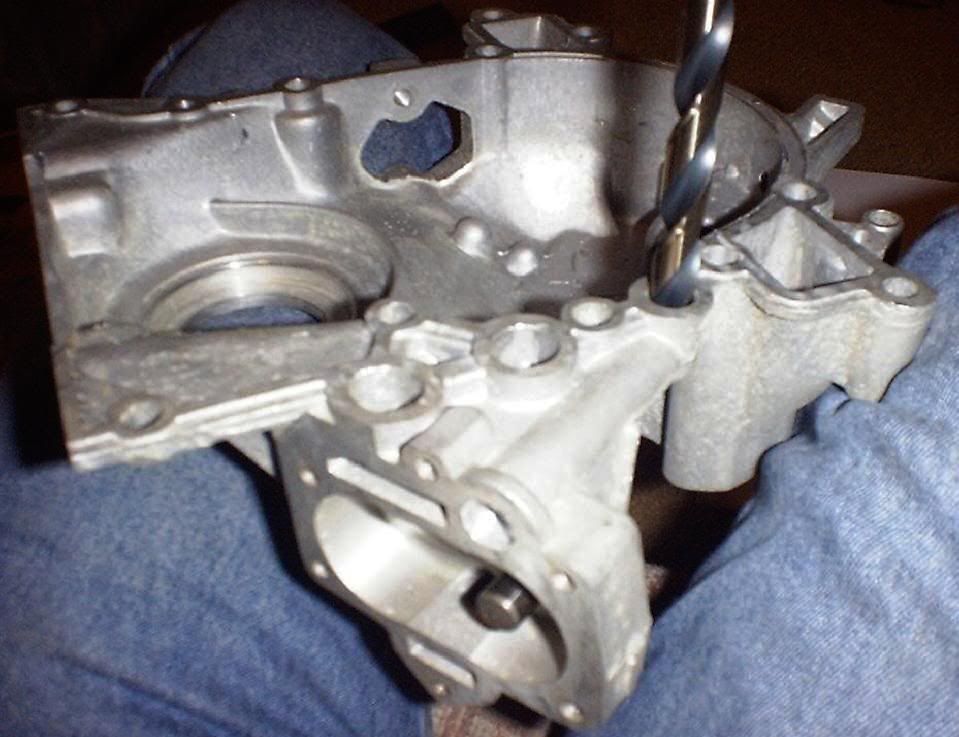
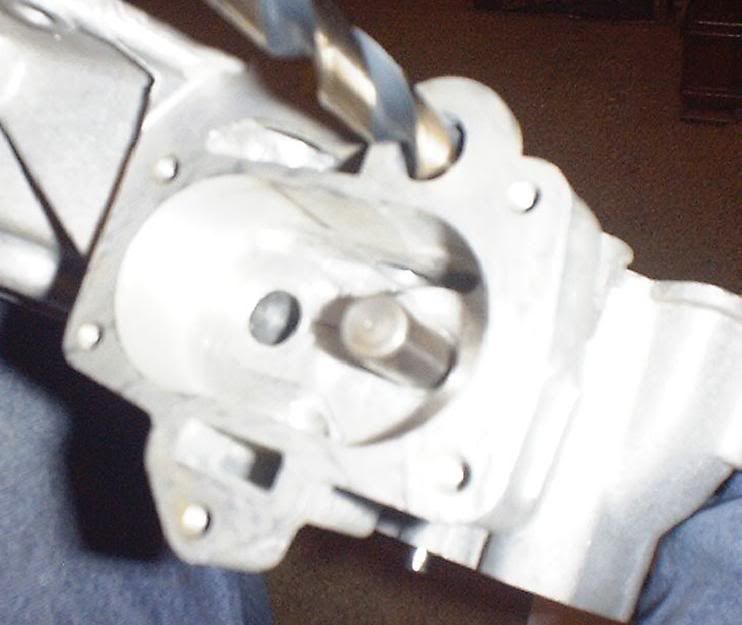
Starting with the cover, the first thing to do is to drill (2) 1/2" holes. One going from the oil pump area, and another to meet that hole from the gasket surface.
![Image]()
![Image]()
After doing that, you'll want to fire up the Dremel again and smooth some corners. Now don't forget that any flashing will both slow flow down AND cost you an engine if it comes loose. Don't be scared to put the cover down, drink some more beers and look at it again with a fresh set of eyes. The main think to imagine is to follow the path of oil (and water) and make it's journey as smooth as possible.
Starting with hole #2, you'll want to give it a nice smooth transition. Then move on to hole #1 and make sure to radius that one as well. Even though #3 doesn't get used, you'll notice that there is casting flash on all four sides of the port holding your oil feed back. Make sure to get rid of all that too.
The square hole that feeds the oil filter adapter can use a little radiusing as well. Don't try and go bezerk here as there isn't much room to work.
The needle files are used to debur any sharp edges. Don't go overboard with them, just do a good job. Some edges you want nice and square, but not enough to draw blood.
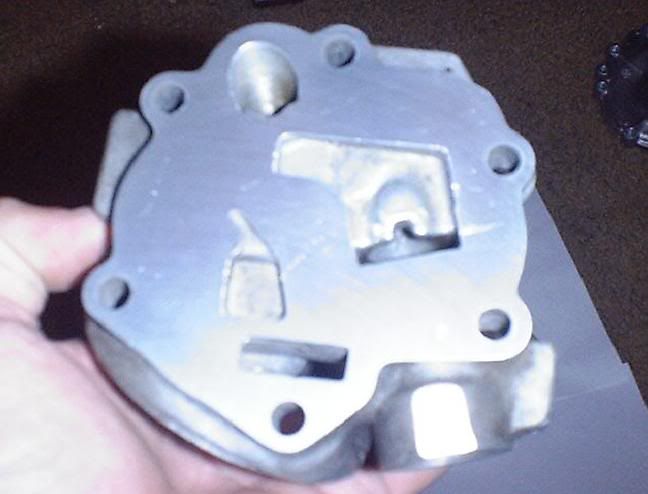
Now Let's look at the oil cooler adaptor. The square hole leading in can stand to be smoothed and radisued as well. That's where the oil feeds the filter and the cooler. The gasket matches up pretty well.
Next is the thrust face, it's going to be nice and scratched up. The accepted fix is to buy a steel thrust plate to have a new wear surface. Personally I'm not really cool with doubleing the chances of having an oil leak there (not to mention all the mismatched surfaces). Take your swirled adaptor and resurface it back to flat.
All you have to do is get a piece of plate glass (your wife's favorite mirror will do. Unless you're married to a coke head. If so, her blow will taste like WD-40) and some fine grit sand paper. Tape the paper to the mirror and lube it with WD-40 or your favorite wet lube. (I've never used astroglide on this type setup so I can't say how the results would be).
Once you have your fixture setup, move the adaptor in smooth figure 8 motions. Be carefull not to rock it on the side, and make sure to turn it frequently (like a hungryman TV dinner). Once you get the adaptor nice and flat, you'll notice that it's going to get harder and harder to lift. As the workpiece get's better it'll develop a suction that holds it to the media. That's a good thing (You might have to slide it off the side of the fixture to get it loose).
![Image]()
I've got a friend that works at a Federal Mogul piston plant and he put mine on a special machine to check porosity. It's now mirror finished and flat to 4 microns. (I was hoping for 3 microns, so I drank up the rest of his beer and fired him). When you get done with the sandpaper method, the finish should be satin, unless you're really bored and really want to keep getting finer and finer with the media. After everything is flat, deburr that piece too.
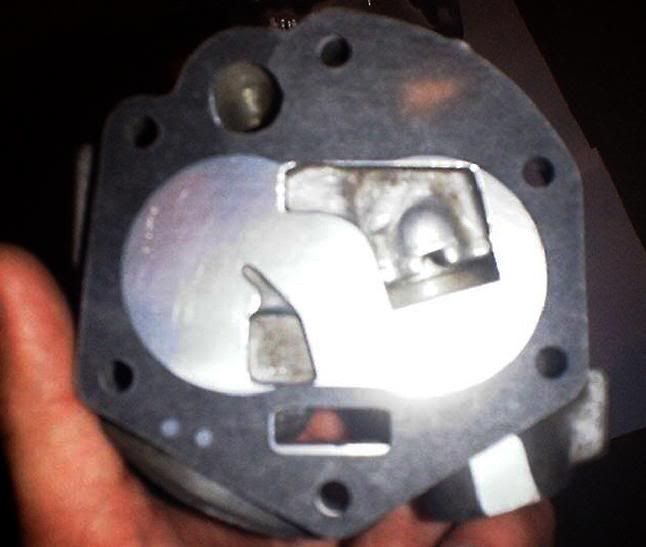
Now on to the gasket matching. Put the gasket on the cover and notice just how far off the oil feel is. Not to mentioned we opened up the hole to 1/2". The easiest way to match the hole is to use a rounded needle file. Hold it almost verticaly and use the cover to guide the file. The gasket will be cut quickly and sharp to match the new port size and placement. Notice that the square hole will be off by quite a bit. Match it too.
![Image]()
After getting your gasket and the cover nice and matched up move it over to the filter adaptor.
![Image]()
If there is any metal showing on the feel hole, go ahead and take care of that. We don't want any steps. Don't radius that one as you want it nice and square. No need to inject any oil under the gasket.
Once you're happy with all the passages and whatnot, it's time to do some assembling. The word for today children is CLEAN CLEAN CLEAN. Brake parts cleaner is only $1.50 a can. Run with that.
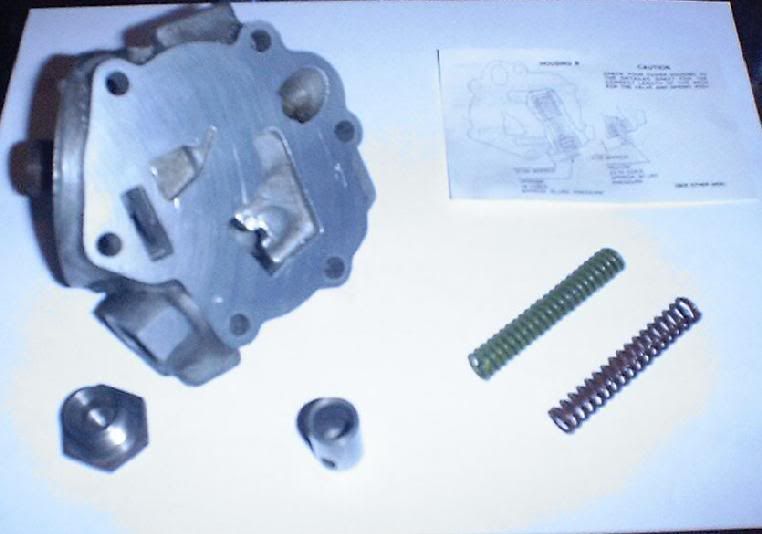
The Melling kit comes with two springs. I like using the stiffer of the two since I've got almost 300K on my engine. (notice the really pretty finish on my adaptor cause I'm so cool)
![Image]()
Soak the gasket in oil while you're cleaning again and let it go ahead and swell up a little. When it's time to assemble, notice that one bolt is longer than the rest. Since they're steel bolts in alum housings, go ahead and put some anti-seize on the threads. After the oil filter adaptor is snug drink another beer and check them again a few minutes later. I find that you can get a little bit more out of the bolts as the gasket conforms to it's new home. Make sure the gears will turn freely and they have some up and down movement. (got to leave room for thermal expansion)
Remember what I said about a Fresh set of eyes??? Go get another beer and grab the timing cover gasket.
I like using Yamabond4 as my RTV of choice. I used a drill as a dowl and glued the cover in place and let it cure for a little while. An interesting note is that the Fel-Pro gasket already has an oil pressure hole that's 1/2". It's not going to match up perfectly, so get the needle file back out and fix it up. do the same with the feel hole that's nowhere near round. This is also a good time to notice that the water pump passages have got A LOT of gasket material sticking into the ports. Go ahead and take care of that too. Your cooling system will thank you.
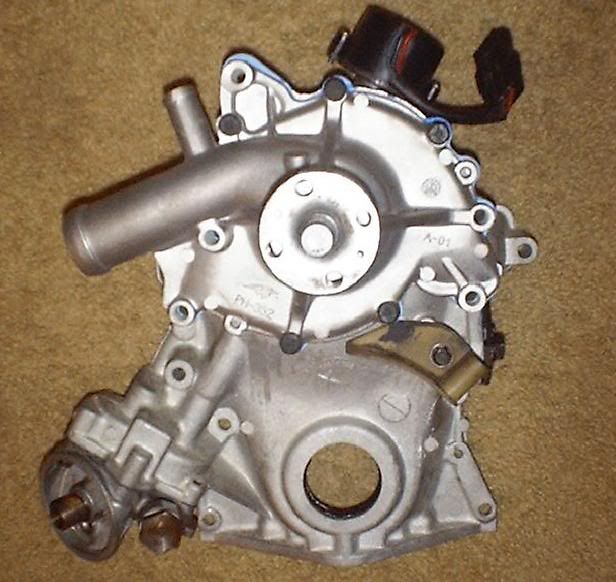
Once all that's done it's time for final assembly. Put your waterpump, crank seal, timing tab, fuel pump block off plate, can sensor, and S-hose in place.
![Image]()
Now you can tell all your friends that you saved a ton of money, did the work yourself and got rid of a bunch of those pesky beers cluttering up your fridge!!
This step is completely optional!!! I did it because I spend alot of time drinking and looking at my cover and filter adaptor.
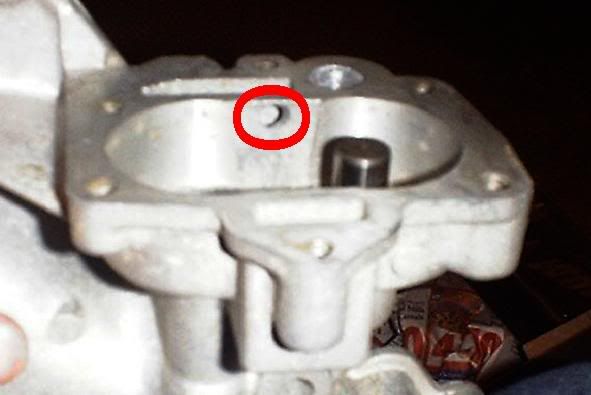
If you notice the way the cover is laid out, it's a really long journey for the oil to have to enter the cover at hole #2 then turn 90* and head up past hole #3 then turn 180* just to go back down into the pump cavity. The cover has a large port just sitting there right at the cavity that blocked off going to waste!! The Kenne-Bell booster pumps used this as a way to supplement oil to the gears and make them more efficient. You had to use one of thier steel thrust plates that had and extra hole and Dremel out a valley in the oil cooler adaptor to make it work. Scary stuff")
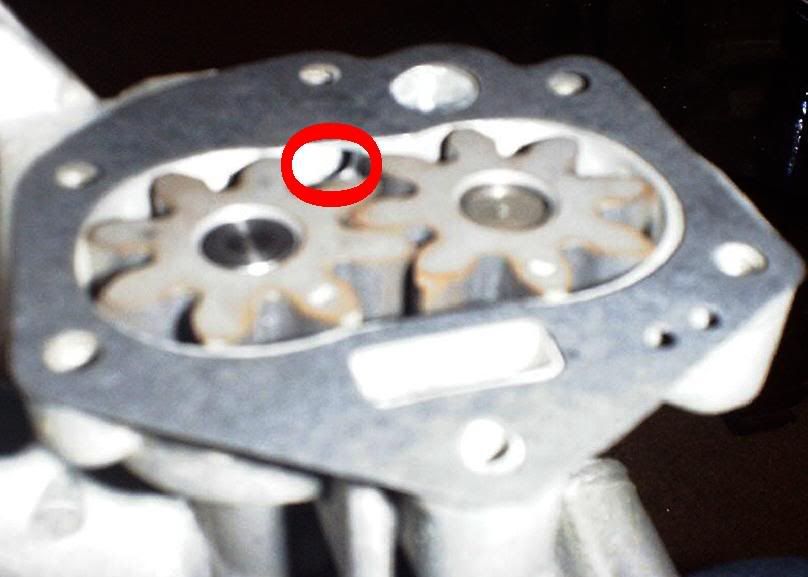
If you drop the gears into the cover and turn them by hand, you can see that all the oil had to enter the pump on only one side. There's not much time for the oil to migrate from one side to the other (.8725"). The other side of the gears are fed by the return path from the bypass valve (do you really want to draw a vaccum on unfiltered oil?!?!).
Rather than get my Dremel back out, I opted to go a diffrent route. I drilled an oval hole right in the rough case area of the pump cavity.
![Image]()
With the gears in place, you can see that the extra oil I provide will hit right in the low pressure area of my pump gears.
![Image]()
As far as and before and after tests, I can't say. But I can say that I'm running thinner oil now, I haven't had the first lifter clatter at startup since I done this, AND my idiot light goes out BEFORE then engine even starts up!!
I'm happy with the way my oiling system came out. The only think that doesn't sit will with me was having to use .012" of gaskets for my side clearance. But that's something I can address later if I need to. The pump can be changed without removing anything but the cooler.
I'll probally edit the tomorrow when I'm sober and can read it in a full size box. If anything's out of order, feel free to mention it.
Oh yeah, Mike and Ken, you can put this in the technical articles if you want after I get it the way I want it. This might be a good one for Turbo Regal Web Site as well.
Earl
Tools needed: Some sort of Dremel tool (A cordless works fine. The cover isn't that tough), a needle file set, 1/2" drill, straight edge (I used my caliper body), feeler gauges, and normal hand tools.
I started with a new GM cover and a Melling oil pump kit. (see post http://www.turbobuicks.com/forums/showthread.php?t=38761 ) The gears are both .8725" tall. (my 140,000GM gears were .8625"). The Melling gears in my cover stuck up .005 above the gasket surface. The gasket that came with the Fel-Pro timing cover gasket kit is .0075 and the Melling gasket was a slimer .006". Those are the uncompressed readings. When I torqued down the thinker gasket, my pump locked up. To get clearance, I had to stack (2) .006 gaskets that I had at the house to make the gears spin. Once you've picked out your gaskets, it's time to fire up the Dremel and make some metal shavings.
It's a good idea to warm up the the cooling passages. That way you can get the Dremel juices flowing without being able to mess with anything critical. Inside the two coolant passages are LOTS of flashing and steps. I like the little 1/2" sanding drums. Them make quick work of that stuff. If you really want to go all out, a small round burr will get into the corners good too. On the front of the cover where they meet the waterpump there's a LARGE step that could stand some smoothing too. (notice that the outside has alot of boogers on it too. I knocked most of them off my cover just to help keep it cleaner) After you've made a nice mess and got all ready to move metal, let's move on to the oil passages.
While looking at the cover you'll notice that there are 3 openings that go to oil cavities.
#1 is the high pressure feel hole that supplies the engine with oil (black gold, Texas tea).
#2 is the feed line from the oil pickup in the pan. (Notice that it's not exactly round. More on that later)
#3 is not used as it mates to a solid chunk of iron on the block.
Starting with the cover, the first thing to do is to drill (2) 1/2" holes. One going from the oil pump area, and another to meet that hole from the gasket surface.
After doing that, you'll want to fire up the Dremel again and smooth some corners. Now don't forget that any flashing will both slow flow down AND cost you an engine if it comes loose. Don't be scared to put the cover down, drink some more beers and look at it again with a fresh set of eyes. The main think to imagine is to follow the path of oil (and water) and make it's journey as smooth as possible.
Starting with hole #2, you'll want to give it a nice smooth transition. Then move on to hole #1 and make sure to radius that one as well. Even though #3 doesn't get used, you'll notice that there is casting flash on all four sides of the port holding your oil feed back. Make sure to get rid of all that too.
The square hole that feeds the oil filter adapter can use a little radiusing as well. Don't try and go bezerk here as there isn't much room to work.
The needle files are used to debur any sharp edges. Don't go overboard with them, just do a good job. Some edges you want nice and square, but not enough to draw blood.
Now Let's look at the oil cooler adaptor. The square hole leading in can stand to be smoothed and radisued as well. That's where the oil feeds the filter and the cooler. The gasket matches up pretty well.
Next is the thrust face, it's going to be nice and scratched up. The accepted fix is to buy a steel thrust plate to have a new wear surface. Personally I'm not really cool with doubleing the chances of having an oil leak there (not to mention all the mismatched surfaces). Take your swirled adaptor and resurface it back to flat.
All you have to do is get a piece of plate glass (your wife's favorite mirror will do. Unless you're married to a coke head. If so, her blow will taste like WD-40) and some fine grit sand paper. Tape the paper to the mirror and lube it with WD-40 or your favorite wet lube. (I've never used astroglide on this type setup so I can't say how the results would be).
Once you have your fixture setup, move the adaptor in smooth figure 8 motions. Be carefull not to rock it on the side, and make sure to turn it frequently (like a hungryman TV dinner). Once you get the adaptor nice and flat, you'll notice that it's going to get harder and harder to lift. As the workpiece get's better it'll develop a suction that holds it to the media. That's a good thing (You might have to slide it off the side of the fixture to get it loose).
I've got a friend that works at a Federal Mogul piston plant and he put mine on a special machine to check porosity. It's now mirror finished and flat to 4 microns. (I was hoping for 3 microns, so I drank up the rest of his beer and fired him). When you get done with the sandpaper method, the finish should be satin, unless you're really bored and really want to keep getting finer and finer with the media. After everything is flat, deburr that piece too.
Now on to the gasket matching. Put the gasket on the cover and notice just how far off the oil feel is. Not to mentioned we opened up the hole to 1/2". The easiest way to match the hole is to use a rounded needle file. Hold it almost verticaly and use the cover to guide the file. The gasket will be cut quickly and sharp to match the new port size and placement. Notice that the square hole will be off by quite a bit. Match it too.
After getting your gasket and the cover nice and matched up move it over to the filter adaptor.
If there is any metal showing on the feel hole, go ahead and take care of that. We don't want any steps. Don't radius that one as you want it nice and square. No need to inject any oil under the gasket.
Once you're happy with all the passages and whatnot, it's time to do some assembling. The word for today children is CLEAN CLEAN CLEAN. Brake parts cleaner is only $1.50 a can. Run with that.
The Melling kit comes with two springs. I like using the stiffer of the two since I've got almost 300K on my engine. (notice the really pretty finish on my adaptor cause I'm so cool)
Soak the gasket in oil while you're cleaning again and let it go ahead and swell up a little. When it's time to assemble, notice that one bolt is longer than the rest. Since they're steel bolts in alum housings, go ahead and put some anti-seize on the threads. After the oil filter adaptor is snug drink another beer and check them again a few minutes later. I find that you can get a little bit more out of the bolts as the gasket conforms to it's new home. Make sure the gears will turn freely and they have some up and down movement. (got to leave room for thermal expansion)
Remember what I said about a Fresh set of eyes??? Go get another beer and grab the timing cover gasket.
I like using Yamabond4 as my RTV of choice. I used a drill as a dowl and glued the cover in place and let it cure for a little while. An interesting note is that the Fel-Pro gasket already has an oil pressure hole that's 1/2". It's not going to match up perfectly, so get the needle file back out and fix it up. do the same with the feel hole that's nowhere near round. This is also a good time to notice that the water pump passages have got A LOT of gasket material sticking into the ports. Go ahead and take care of that too. Your cooling system will thank you.
Once all that's done it's time for final assembly. Put your waterpump, crank seal, timing tab, fuel pump block off plate, can sensor, and S-hose in place.
Now you can tell all your friends that you saved a ton of money, did the work yourself and got rid of a bunch of those pesky beers cluttering up your fridge!!
This step is completely optional!!! I did it because I spend alot of time drinking and looking at my cover and filter adaptor.
If you notice the way the cover is laid out, it's a really long journey for the oil to have to enter the cover at hole #2 then turn 90* and head up past hole #3 then turn 180* just to go back down into the pump cavity. The cover has a large port just sitting there right at the cavity that blocked off going to waste!! The Kenne-Bell booster pumps used this as a way to supplement oil to the gears and make them more efficient. You had to use one of thier steel thrust plates that had and extra hole and Dremel out a valley in the oil cooler adaptor to make it work. Scary stuff
If you drop the gears into the cover and turn them by hand, you can see that all the oil had to enter the pump on only one side. There's not much time for the oil to migrate from one side to the other (.8725"). The other side of the gears are fed by the return path from the bypass valve (do you really want to draw a vaccum on unfiltered oil?!?!).
Rather than get my Dremel back out, I opted to go a diffrent route. I drilled an oval hole right in the rough case area of the pump cavity.
With the gears in place, you can see that the extra oil I provide will hit right in the low pressure area of my pump gears.
As far as and before and after tests, I can't say. But I can say that I'm running thinner oil now, I haven't had the first lifter clatter at startup since I done this, AND my idiot light goes out BEFORE then engine even starts up!!
I'm happy with the way my oiling system came out. The only think that doesn't sit will with me was having to use .012" of gaskets for my side clearance. But that's something I can address later if I need to. The pump can be changed without removing anything but the cooler.
I'll probally edit the tomorrow when I'm sober and can read it in a full size box. If anything's out of order, feel free to mention it.
Oh yeah, Mike and Ken, you can put this in the technical articles if you want after I get it the way I want it. This might be a good one for Turbo Regal Web Site as well.
Earl


